Intermatic timer switches offer precise control for automating lighting and appliances, enhancing energy efficiency and security․ This guide provides step-by-step instructions for installation, programming, and troubleshooting, ensuring optimal performance․
Overview of Intermatic Timer Switches
Intermatic timer switches are versatile devices designed to automate lighting, appliances, and other electrical systems․ They offer precise control over on/off schedules, enhancing energy efficiency and convenience; Available in various models, including mechanical and digital options, these timers cater to different user needs․ Mechanical timers use pins to set schedules, while digital models feature LCD screens for advanced programming․ Some Intermatic timers include special modes like dawn/dusk settings for automated operation based on sunrise and sunset times․ With options for weekly programming and recurring schedules, these devices provide flexibility and customization․ Additionally, certain models support integration with smart home systems, allowing remote control via smartphones․ Their durable design ensures long-term reliability, making Intermatic timers a practical solution for residential and commercial applications․
Importance of Proper Installation and Programming
Proper installation and programming of Intermatic timer switches are crucial for ensuring safe, efficient, and reliable operation․ Incorrect wiring or programming can lead to malfunctions, safety hazards, or energy inefficiency․ Following the manufacturer’s instructions step-by-step helps prevent errors and ensures the timer functions as intended․ Correct installation guarantees secure connections, avoiding short circuits or electrical damage․ Programming accurately reflects your desired schedule, optimizing energy usage and automating tasks effectively․ Proper setup also extends the lifespan of the timer and connected devices․ By adhering to guidelines, users can enjoy seamless control over lighting and appliances, enhancing convenience and energy savings․ Neglecting proper procedures may result in faulty operation or premature wear, emphasizing the need for careful attention during installation and configuration․

Preparation for Installation
Preparation involves understanding the timer’s components, gathering necessary tools, and ensuring safety by turning off power before starting the installation process․
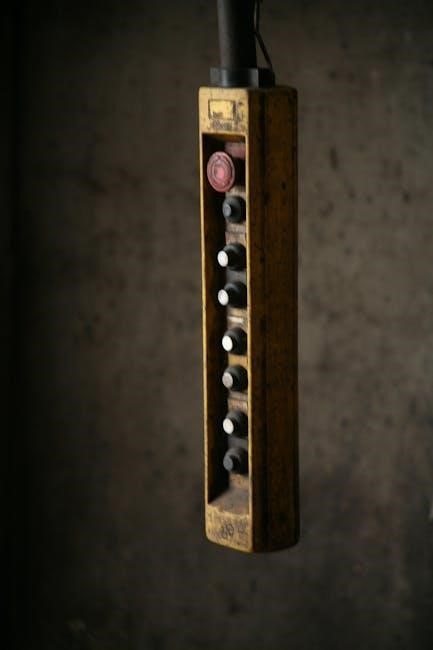
Understanding the Components of the Timer
The Intermatic timer consists of a dial for setting the current time, ON/OFF buttons for manual control, and programming buttons for custom schedules․ The timer also includes a battery holder to maintain settings during power outages and a wall plate for mounting․ Additional components may include a remote switch for multi-switch applications and mounting hardware for secure installation․ Understanding these parts ensures proper setup and functionality․ The timer’s design allows for easy navigation, with clear indicators for time settings and scheduling options․ Familiarizing yourself with these components is essential for successful installation and programming․ Always refer to the provided instructions for specific details on each part and its operation․
Gathering Necessary Tools and Materials
To install an Intermatic timer switch, gather the following tools and materials: a screwdriver (both flathead and Phillips), needle-nose pliers, wire strippers, and a voltage tester․ Ensure you have the timer unit, wall plate, and mounting screws provided in the packaging․ Additional materials like wire connectors or electrical tape may be needed for secure connections․ If dealing with three-way wiring, a remote switch may also be required․ Always consult the user manual for specific requirements․ Safety gear, such as gloves and safety glasses, is recommended․ Make sure all components are compatible with your electrical system․ Having these tools and materials ready ensures a smooth installation process and prevents delays․ Proper preparation is key to a successful setup․
Ensuring Safety Before Starting the Installation
Before installing an Intermatic timer switch, ensure all safety precautions are taken to avoid electrical shocks or injuries․ Turn off the power to the circuit at the main electrical panel or breaker box․ Verify the power is off using a voltage tester to confirm no electricity is present․ Do not rely solely on the circuit breaker; always double-check with a tester․ Avoid touching live wires or components to prevent electrical hazards․ Wear protective gear, such as insulated gloves and safety glasses, to safeguard against accidental shocks or debris․ Ensure the work area is well-lit and free from clutter․ If unsure about any step, consult a licensed electrician․ Safety should always be the top priority when working with electrical systems․

Installation Process
Mount the timer securely, connect wires properly, ensure all components are in place, set up three-way wiring if necessary, and follow instructions for reliable operation․
Connecting the Wires to the Timer
Begin by turning off the power at the circuit breaker․ Identify the wires: black (line), white (neutral), and copper (ground)․ Connect the black wire to the timer’s “LINE” terminal and the white wire to the “LOAD” terminal․ For three-way wiring, additional connections are required․ Secure the ground wire to the timer’s grounding terminal․ Ensure all connections are tight and properly insulated․ Refer to the manual for specific terminal labels, as they may vary by model (e․g․, ST01 or T104)․ After wiring, tuck the wires neatly into the wall box and proceed with mounting the timer․ Always double-check connections to avoid malfunctions and ensure safe operation․
Mounting the Timer to the Wall Box
After connecting the wires, carefully align the timer with the wall box, ensuring it is level․ Use the provided screws to secure the timer firmly in place․ Tighten the screws gently to avoid damaging the device․ Make sure the timer is flush with the wall for a professional finish․ For models with a removable cover, ensure it is properly clicked in after mounting․ Some timers may require additional brackets for stability, so refer to the manual for specific instructions․ Once mounted, verify that the timer is secure and the wall plate is correctly aligned before proceeding to programming or further adjustments․ Proper mounting ensures reliable operation and prevents potential mechanical issues․
Securing the Timer and Replacing the Wall Plate
Once the timer is mounted, ensure all wires are neatly tucked into the wall box to prevent interference․ Replace the wall plate by aligning it properly with the timer’s housing․ Secure the wall plate using the provided screws, tightening them firmly but avoiding overtightening, which could damage the device․ Double-check that the timer is level and the wall plate is flush with the wall for a clean appearance․ After securing, test the timer by toggling the switch or pressing the programming buttons to confirm it functions correctly․ Properly securing the timer and wall plate ensures durability and reliable operation over time․ This step completes the physical installation process, allowing you to proceed with programming the timer according to your needs․
Setting Up the Timer for Three-Way Wiring
For three-way wiring, install the remote switch in the second wall box․ Connect the traveller wires between the timer and remote switch to ensure both can control the load․ After wiring, test both switches to confirm they work with the timer․ Ensure the remote switch is properly configured for on/off control․ Secure all connections and replace wall plates for a safe and neat installation․ This setup allows control from two locations, enhancing convenience and functionality․
Programming the Timer
Set the current time, then program custom on/off times using pins or buttons․ Use recurring schedules for weekly settings and special modes like Dawn/Dusk for energy efficiency․
Setting the Current Time on the Timer
To set the current time on your Intermatic timer, locate the timer and align the arrow with the correct hour on the dial․ Adjust for minutes by estimating between the hour marks․ Double-check the time using a clock to ensure accuracy, and let the timer run for a few minutes to verify proper function․ If the timer is battery-powered, ensure the battery is fresh for reliable timekeeping․ For precise timekeeping, consider setting the timer a few minutes fast․ After setting, monitor the timer to ensure it activates lights or devices as expected․ This step is crucial for accurate automation of your programmed settings․
Programming Custom On/Off Times
To program custom on/off times, start by setting the current time on the timer․ Next, identify the specific times you want your lights or devices to turn on and off․ Use the pins or buttons provided on the timer to mark these times․ For mechanical timers, push down the pins at the desired on times and pull them out for off times․ For digital timers, navigate through the menu to set these times manually․ Test your settings to ensure they work correctly․ Remember to save your programmed settings to avoid losing them during power outages․ This feature allows you to customize your schedule, offering flexibility and convenience for your daily needs․ Proper programming ensures your devices operate efficiently and according to your preferences․ Always refer to the user manual for detailed instructions specific to your timer model․ By following these steps, you can enjoy seamless automation in your home or workspace․ Regularly check and update your programmed times to maintain accuracy and functionality․ This step-by-step process ensures your timer works precisely as intended, enhancing your overall experience with Intermatic timers․
Using Recurring Schedules and Weekly Settings
Intermatic timers allow you to set recurring schedules and weekly settings, enabling you to automate tasks like turning lights on/off at specific times each day․ To use this feature, navigate to the timer’s menu and select the desired days of the week․ Use the buttons or dial to set the exact on and off times for each day․ For example, you can program your lights to turn on at 6 AM and off at 7 PM, Monday through Friday, and adjust the times for weekends․ Some models also offer astronomic timing, which automatically adjusts based on sunrise and sunset․ Test your settings to ensure they work correctly․ This feature is ideal for maintaining consistent routines and reducing manual adjustments․ By scheduling your devices to operate on a weekly basis, you can enhance energy efficiency and convenience in your home or workspace․
Understanding Special Modes (Dawn/Dusk)
Intermatic timers offer Dawn/Dusk modes for automatic operation based on sunrise and sunset times, enhancing convenience and energy efficiency․ To activate this feature, ensure the timer’s time and date are correctly set․ Some models require selecting Dawn/Dusk mode from the menu or pressing specific buttons․ The timer calculates these times using internal algorithms, often without needing internet connectivity․ For accuracy, especially across seasons, ensure your location and time zone are set correctly․ To override the mode temporarily, such as for special events, consult the manual for instructions․ Battery health is crucial for accurate scheduling, so check and replace batteries as needed․ Testing the mode by observing operations during sunrise and sunset can confirm functionality․ This feature is particularly useful for outdoor lighting, ensuring lights activate at appropriate times year-round․
Troubleshooting Common Issues
Identify timer malfunctions by checking wire connections and ensuring proper installation․ Resetting to factory settings or replacing batteries often resolves issues․ Refer to the manual for detailed solutions․
Identifying and Resolving Timer Malfunctions
Begin by checking the timer’s power supply and ensuring all wires are securely connected․ If the timer fails to turn on, verify that the circuit breaker hasn’t tripped․ For mechanical timers, inspect the dial and trippers for proper alignment and movement․ If the timer isn’t following the set schedule, reset it by pressing and holding the ON/OFF button․ For digital timers, ensure the current time and date are correctly set․ If issues persist, refer to the user manual or contact Intermatic support for further assistance․ Regular maintenance, such as cleaning the timer and replacing batteries, can prevent many common malfunctions․
Fixing Issues with the Timer’s Mechanical Parts
If the timer’s mechanical parts malfunction, start by checking the dial and trippers․ Ensure the dial rotates smoothly and the trippers are correctly positioned․ For issues where the dial doesn’t move, gently adjust the trippers or reset the timer by pressing and holding the ON/OFF button․ If the timer’s mechanical components are worn, replace them with genuine Intermatic parts․ For models like the T104, ensure the cog is moving and free from obstructions․ Clean the mechanical parts regularly to prevent dust buildup․ If the timer still doesn’t function, refer to the manual or contact Intermatic support for assistance․ Regular maintenance can help extend the lifespan of the timer’s mechanical components․
Resetting the Timer to Factory Settings
To reset your Intermatic timer to factory settings, first ensure the timer is powered off by disconnecting it from the electrical supply․ Press and hold the ON/OFF button for 10-15 seconds to clear any stored programming․ Release the button and reconnect the power․ The timer will revert to its default settings, and the current time will need to be reset․ Note that all custom schedules and programmed times will be erased during this process․ For models with a battery, removing and reinstalling the battery can also reset the timer․ After resetting, reprogram the timer according to your preferences․ Always refer to the user manual for specific reset instructions, as procedures may vary slightly between models․
Maintenance and Upkeep
Regular maintenance ensures optimal performance of Intermatic timers․ Clean the timer and components periodically, replace batteries as needed, and update firmware if applicable to maintain functionality and efficiency․
Cleaning the Timer and Its Components
Regularly cleaning your Intermatic timer and its components ensures smooth operation and prevents dust buildup that could interfere with functionality․ To clean the timer, first turn off the power supply to avoid any electrical risks․ Use a soft, dry cloth to gently wipe down the timer’s exterior and any visible components․ For more detailed cleaning, such as between small parts or Contacts, use a cotton swab lightly dampened with distilled water․ Avoid using harsh chemicals or abrasive materials, as they may damage the timer’s finish or internal mechanisms․ Allow all components to dry thoroughly before restoring power․ Cleaning should be done every 6–12 months or as needed to maintain optimal performance and extend the timer’s lifespan․ Additionally, inspect for dust or debris accumulation in sliding parts and gently remove it to ensure proper mechanical operation․ For advanced models with digital displays, use a screen cleaning wipe to maintain clarity․ Always refer to the manufacturer’s guidelines for specific cleaning recommendations tailored to your timer model․ By keeping your timer clean and well-maintained, you ensure precise scheduling and reliable operation year-round․ Regular cleaning also helps prevent unexpected malfunctions and extends the overall lifespan of the device․ If you notice any stubborn stains or corrosion, address them promptly to avoid permanent damage․ Cleaning is a simple yet crucial step in maintaining your Intermatic timer’s efficiency and functionality․
Replacing Batteries and Ensuring Proper Functionality
Replacing batteries in your Intermatic timer is essential for maintaining its functionality, especially in models that rely on battery power for operation․ Start by turning off the power to the timer at the circuit breaker or fuse box to ensure safety․ Open the timer by gently pulling out the battery holder or removing the cover, depending on the model․ Remove the old batteries and insert new ones, ensuring they are correctly oriented as indicated by the polarity symbols․ For timers with a battery compartment, push the holder back into place until it clicks securely․ Most Intermatic timers retain their programming settings during battery replacement, but the current time may need to be reset if the batteries are replaced on the same day․ After replacing the batteries, restore power and verify that the timer operates correctly․ Regular battery replacements help prevent unexpected malfunctions and ensure precise scheduling․ Always use high-quality batteries to avoid issues with performance․ If the timer has a backup battery, ensure it is also replaced as needed to maintain uninterrupted functionality․ Proper battery maintenance is crucial for the timer’s reliability and efficiency, especially in models with advanced features like astronomic timing or smart device integration․ By keeping the batteries up to date, you ensure your timer continues to function smoothly and efficiently․ Always refer to the user manual for specific instructions tailored to your timer model․ This simple step can prevent a range of issues and keep your timer working at its best․ Regular checks on battery health can also help avoid sudden failures, ensuring your schedules remain uninterrupted․ Replacing batteries is a straightforward process that requires minimal tools and time but is vital for optimal performance․ If you notice any signs of battery degradation, such as erratic behavior or dimming displays, replace the batteries promptly to avoid losing your settings․ Proper battery care extends the lifespan of your Intermatic timer and ensures it continues to meet your needs effectively․
Updating Firmware or Software (If Applicable)
Some advanced Intermatic timers may require firmware or software updates to enhance functionality, fix bugs, or add new features․ Check the manufacturer’s website for the latest updates compatible with your timer model․ Download the update file and transfer it to the timer using a USB connection or wireless link, depending on the model․ Ensure the timer is powered on and follow the on-screen instructions carefully to avoid interruptions․ After completing the update, restart the timer to apply the changes․ Regularly updating firmware ensures optimal performance, security, and compatibility with smart devices․ Always verify the authenticity of update sources to prevent potential issues․ If unsure, consult the user manual or contact customer support for guidance․ Updating firmware is a straightforward process that keeps your timer running smoothly and efficiently․

Advanced Features of Intermatic Timers
Intermatic timers offer advanced features like multi-switch applications, smart device integration, and astronomic timing for energy efficiency․ These features enhance functionality and customization for modern automation needs․
Using Remote Switches for Multi-Switch Applications
Intermatic timers support multi-switch applications, allowing control of multiple devices from a single location․ Remote switches can be installed in additional wall boxes, enabling seamless integration with the timer․ For proper functionality, remote switches must be wired correctly, ensuring they communicate with the main timer unit․ Installation involves connecting the remote switch to the timer’s wiring system, typically requiring a traveler wire for communication․ This setup is ideal for controlling lights or appliances in different areas of a building․ Always refer to the wiring diagram provided in the manual to ensure proper connections․ Multi-switch applications enhance flexibility and convenience, making it easier to manage your timer-controlled devices efficiently․ Proper wiring and configuration are essential for reliable performance․
Integrating Smart Devices with the Timer
Intermatic timers can be integrated with smart devices for advanced automation and remote control․ Many models are compatible with popular smart home systems, allowing users to control their timers via voice commands or mobile apps․ To integrate, ensure the timer is connected to a compatible hub or bridge․ Some models require a specific adapter or module for smart functionality․ Once connected, users can program custom scenes, receive notifications, and monitor energy usage remotely․ For optimal performance, ensure the timer’s firmware is up to date․ Refer to the product manual for specific pairing instructions and compatibility details․ This integration enhances convenience and energy efficiency, making it easier to manage your timer-controlled devices from anywhere․ Always follow the manufacturer’s guidelines for a seamless setup process․
Utilizing Astronomic Timing for Energy Efficiency
Intermatic timers with astronomic timing automatically adjust based on sunrise and sunset, optimizing energy usage․ This feature eliminates manual adjustments, as the timer calculates dawn and dusk times according to the date and location․ To activate, set the timer’s internal clock and enable the astronomic mode․ The timer will then synchronize lighting or appliance operation with natural daylight patterns, reducing energy waste․ For example, outdoor lights can turn on at dusk and off at dawn․ This mode is especially useful for seasonal adjustments, as it adapts to changing daylight hours throughout the year․ Ensure the timer’s location and date settings are accurate for precise operation․ This advanced feature enhances energy efficiency and convenience, making it ideal for outdoor and security lighting systems․ Refer to the manual for specific activation steps and compatibility details․